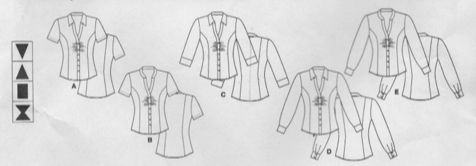
Princess Line Shirt with Gathers (Vogue 8747)
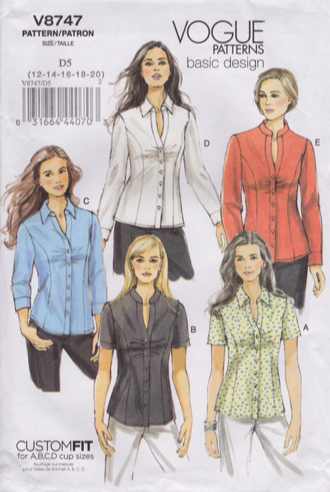
Stage One: Selecting the Pattern
I liked the fact that this pattern took a wardrobe basic - the Princess Line Shirt - and added an additional touch of femininity with the gathers at the bust. It helped that I had seen a lot of women wearing it and decided that I wanted one too!
Stage Two: Adjusting the Pattern
I have adjusted this pattern using the techniques detailed in Barbara Deckert's online Plus Size Pattern Fitting and Design class.
The bust, or cup size, adjustment added a great deal of length to the front and facing pieces - which lowers the Waist Point. It also may change the location of the gathering. Those will both need to be sorted out using the muslin.
The bust, or cup size, adjustment added a great deal of length to the front and facing pieces - which lowers the Waist Point. It also may change the location of the gathering. Those will both need to be sorted out using the muslin.
Stage Three: Fitting the Muslin
I have completed one initial muslin fitting using the techniques detailed in Lynda Maynard's online Sew the Perfect Fit class.
The first thing I noticed was that the bust, or cup size, adjustment had added just the right amount of fabric to the side Front piece. However, there were going to need to be some length adjustments made to the centre Front piece because the additional length had definitely lowered the waist point substantially.
In addition, it was clear that I did not need the additional width that I had added to the top of the Princess Line. In fact, the width was only required below the waist. So … I have resewn and trimmed that excess so that it will be easier to fit the original princess line more easily.
Stage Four: Selecting the Fabric
The pattern recommends the use of Lightweight Broadcloth, Sateen, Lightweight Crepe, Shantung
Stage Five: Making the Garment
These are the steps that I followed when I made this pattern in late 2012.
I've tried to follow the steps outlined in Craftsy's The Classic Tailored Shirt class (Pam Howard) - with a few additional steps - necessitated by this pattern.
PREPARE (i.e., complete all the steps on the New Sewing Project Checklist).
MAKE SHIRT FRONT AND SHIRT BACK
This involves creating the Princess Line seams that join the two front (x2) and three back pieces together.
- When working with the front pieces only:
-- Mark the notches with chalk (as they will be lost when you start clipping).
-- Between the notches, mark the 1.5cm seam allowance (with either chalk or a stitching line).
-- Clip it. Note: Make a cut approximately every 0.5 cm being careful not to go more than 0.2 cm towards the seam allowance.
-- Pin to the curved edge.
- Sew together with the clipped, straighter edge on the top.
- Overlock finished seams together.
- Press the seams. Front = Towards CF. Back = Away from CB.
MAKE AND ATTACH THE BAND TO THE SHIRT FRONT
Warning: Pattern says to have the interfacing on the top layer. However, it will look better if it it is on the bottom layer because then, when it turns out a little with the collar that is the side that is visible.
- Sew the right sides, of interfaced and non-interfaced, bands together alone the untouched edge. Trim, Turn and Press. NB: Will need to ease fullness by clipping.
- Make gathers
- Sew the non-interfaced side of front band to Shirt front. Note: Ease fullness by clipping.
- Turn in seam allowance on long notched edge of each of the Interfaced front bands. Trim, Turn and Press. Note: Ease fullness by clipping.
- Slipstitch pressed edge of band over seam.
- Edgestitch along both edges of the front band.
JOIN SHIRT FRONT TO SHIRT BACK
MAKE THE COLLAR
- Turn up, and press, long edge of non-interfaced collar band
- Sew the collar pieces together. Trim (to 1/4 inch) and press open - preferably using a collar press!
- Turn the collar.
- Press the collar (towards the "under collar" which is the non-interfaced side).
- Edgestitch the collar - with the "upper collar" (i.e., interfaced side) on the top.
- Press collar one final time - preferably on the right side using a teflon-protected iron. Note: Press DON'T SLIDE.
- Attach the collar to the collar band. Note: Lay the interfaced band piece on the bottom, then non-interfaced side of collar and then non-interfaced collar piece. ***Pin up the folded up bit. Tip: When stitching have the Interfaced side up!
- Press the collar, with band, open - one side at a time. Tip: On the first side, you don't do the ends … just as much as you can manage.
ATTACH THE COLLAR TO THE SHIRT
- Sew the Interfaced side of collar band to the right side of the shirt. Note: This means that you will be hand sewing the FRONT side of the band.
- Pin and hand sew the non-interfaced side of the collar band to finish. Note: Fell stitch vs Slipstich?
- Press the collar band.
- Edgestitch the collar band. NB: Put loose cotton thread at each end (so you will have something to pull on when it gets hard). Start at the top middle and DON'T BACKSTITCH.
ATTACH THE SLEEVE TO THE SHIRT
- Sew the sleeve to the main body of the shirt then overlock and press it towards shirt itself. Tip: Start from the bottom of the shirt because it is really important those line up for the hem.
- Sew the sleeve and side seams together then overlock and press towards the back.
PUT CUFF ON SLEEVE
- Apply interfacing. Note: Interfacing should only be on the main 'public' facing side but extend just over half way to give a sharp edge.
- Fold back and then press the facing side 1.5cm.
- Sew the cuff ends together and press open. WARNING: Unless pattern has been altered make seam 0.5cm only!!!
- Attach cuff to sleeve, trim and press towards cuff.
- Slipstitch cuff edge.
- Edgestitch both ends of cuff.
HEM THE SHIRT
- Baste stitch 1.5cm away from hem edge.
- Press the hem so that you can just see the guide stitch on the inside.
- Fold the hem edge to the ironed edge - creating a narrow hem. Tip: You can pin or just sew as you tuck.
- Sew the hem
ADD BUTTONS