Tutorial: Sorting Sleeves
The most important thing that I learned is that, if you have a larger upper arm, your sleevehead length will be longer than the armscye that you are fitting it into and that means you will have to figure out a way to deal with that additional fabric. In my case, the sleeve was 8.5cm longer than the armscye. That is a full 6.0cm longer than the standard 2cm recommended for ease (i.e., 1cm at the front and 1 cm at the back).
It took me a long time to accept that simple fact. My refusal to accept that simple fact led me down a couple of 'rabbit holes' that extended this process dramatically.
My first diversion, was to read, and re-read, all the standard advice about trying to reduce the difference. The problem with trying to apply these techniques is that they are designed to deal with the much smaller differences in length thatn you would be dealing with if you were working with a relatively 'normal sized' arm. They will only help to get rid of 1-2 cm at most - not 8.5cm!
My second diversion was to kid myself into thinking that I could somehow reduce the difference if I just drafted the sleeve from scratch - rather than using a commercial sleeve pattern. I actually went ahead and redrafted a sleeve from scratch - only to find that I'd ended up with about the same difference as I had seen when I used a commercial pattern.
In the end, I had to accept the fact that you 'cannot change the laws of physics'. Due to the size of my upper arm, this process was going to be more challenging and I was going to have to figure out a way to deal with the inevitable surplus sleevehead length.
Although it was not specifically written for plus-sizes, I found the information I needed in Sarah Veblen's book The Complete Photo Guide to Perfect Fitting. Her straight forward, no nonsense approach provided me with the sequence of steps I ultimately followed and have detailed below:
1. Finalise Armscye
2. Draft Sleeve
3. Fit Short Sleeve
4. Fit Long Sleeve
5. Check Movement
Step One: Finalise Armscye
The sleeve does not exist in isolation. It is joined to the bodice at the Armscye (or Armhole).
The first step in sorting your sleeve is to ensure that you have perfected the Armscye to sew it into.
To finalise your armscye:
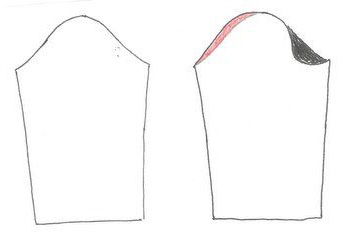
What I found when I completed this process was that my front of my armscye was shorter, and more angled, than the back of my armscye.
The first step in sorting your sleeve is to ensure that you have perfected the Armscye to sew it into.
To finalise your armscye:
- If you do not already have one, make a muslin of a bodice. Ideally, this muslin should include a larger than normal seam allowance (i.e., at least 2-3cm) at the armhole to give you more fabric to 'play with' as you finalise the armscye.
- Put on the muslin and get someone to help you mark the following critical points: (a) Shoulder - Traditionally, this has been the place at the 'hinge point' where your shoulder bone joins your upper arm. You can easily find this by moving your arm up and down and finding the place where the movement occurs. However, I have read that it can sometimes look better to move the shoulder point to beyond that hinge point - particularly if you are trying to balance larger hips. I found that I needed to move it out about 1.5cm. (b) Crease - This is the line that is created when your arm is at your side. Sarah Veblen's book The Complete Photo Guide to Perfect Fitting has some excellent pictures. (c) Underarm - At the underarm seam, measure either 1 inch (for sleeved) or 1/2 inch (for sleeveless) from the underarm. The best way to find this point is to get one of those American rulers that are exactly 1 inch wide. Place it under your arm, horizontal to the floor, and mark where it falls.
- Transfer these three critical points from your muslin on to the pattern.
- Use a French Curve to find the most pleasing curve between those three points.
- Make, or alter, the muslin and try it on again to check that you are happy with the new armscye.
What I found when I completed this process was that my front of my armscye was shorter, and more angled, than the back of my armscye.
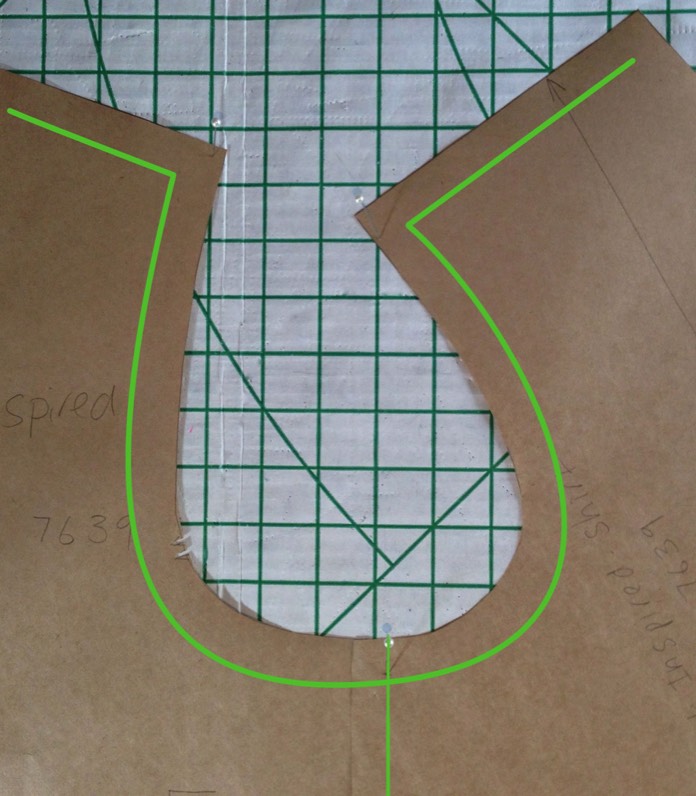
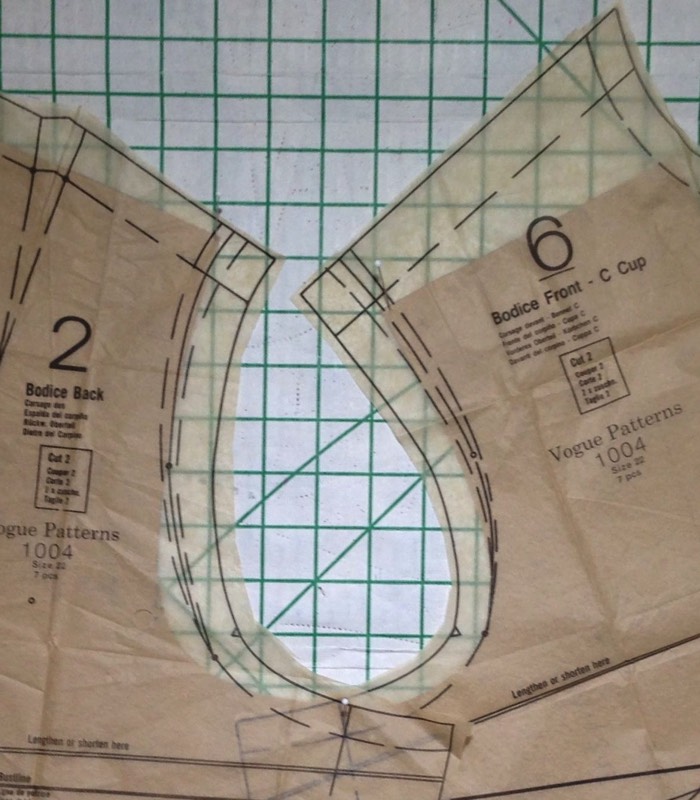
When I compare this to the standard armscye on a commercial pattern (Vogue 1004), I see the main differences are that the front of my armscye is shorter and the back of my armscye is both taller and deeper.
Step Two: Modify Sleeve Width

I picked the sleeve in the Vogue's Basic Sloper pattern (Vogue 1004). Why? It was the sleeve that Susan Khalji was planning to use for her online The Couture Dress class. She liked it because it included an elbow dart. And, from my reading, having a sleeve with an elbow dart is very desirable.
To modify a sleeve's width:
1. Measure the widest part of your upper arm.
2. Take that measurement and add seam allowance (i.e. 2 x 1.5cm = 3.0cm) and Ease (start with 5.0cm but you could add as much as 7.0cm). This is your modified Arm Measurement.
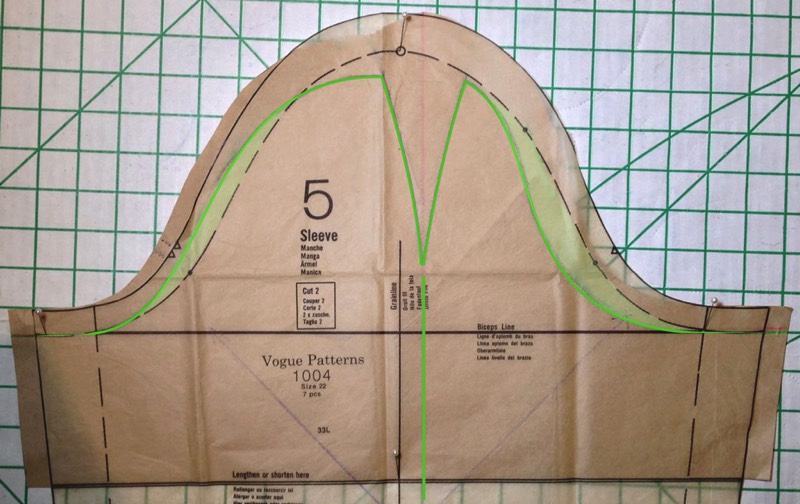
3. Measure the sleeve width of your selected sleeve. Note: The sleeve width is the length of the widest part of the sleeve. It is the horizontal line under the sleeve cap and above the main part of the sleeve (as shown in the image to the left).
4. Determine how much you need to add to the Front and Back of your sleeve pattern. To do this, subtract the Pattern's Sleeve Width from your Modified Arm Measurement. Then divide that amount by 2.
5. Add that amount, evenly, to each side of the sleeve width. Tip: This will increase the width of the sleeve. Rather than adding that width down the entire length of the sleeve, you can draw a line from the widest point down to the elbow. This was a great tip I gleaned from Barbara Deckert's online Plus Size Pattern Fitting and Design class.
Step Three: Fit Short Sleeve
Fitting a short, rather than full length, sleeve allows you to focus all of your attention on how the sleeve is fitting into your perfected armscye. You will not have to get distracted with things like the placement of the elbow dart, sleeve length or cuff placement.
To fit the short sleeve:
1. Make Sleeve Muslin - Cut out the short version of your newly widened sleeve. Thread-trace both the Grainline and Crossgrain.
2. Attach Sleeve to Bodice - Barely attach the sleeve to the your existing bodice muslin with the perfected armscye. Stitch only the underarm area and pin the shoulder line.
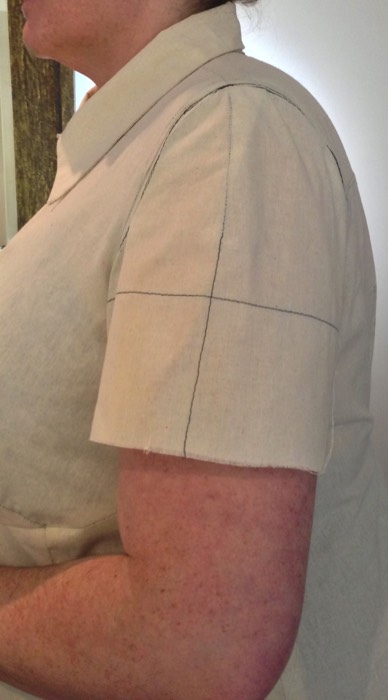
3. Check Shoulder Line - The first thing to check, is whether the shoulder line sits well. I found that, in order to get the sleeve to 'sit right', I needed more of the sleeve in the back. So … I moved the Shoulder Line 1.5cm towards the front.
4. Check Sleeve Cap - The next thing to check is whether you have just the right amount of sleeve cap height - not too much and not too little. To do this smooth the sleeve cap up towards the armscye, at the shoulder, and mark the new sleeve cap height. You may need to either lengthen or shorten the sleeve cap. I found the pictures in Sarah Veblen's book The Complete Photo Guide to Perfect Fitting very helpful in figuring out the optimal sleeve cap height for me. I ended up reducing the sleeve cap height on the original pattern by approximately 1.5cm.
5. Collect Surplus Ease - This is where you decide how to deal with the inevitable excess sleeve head length. You could try using gathering, pleating or adding one or more darts. What I ultimately ended up doing was redrafting the sleeve as a two piece sleeve (like the ones used in jackets) and taking the surplus in at those seams.
6. Smooth Edges - As a final check of the sleeve placement within the armscye, you could try smoothing the ere of the sleeve towards the armscye and either adding or removing fabric until it sits perfectly.
Step Four: Fit Long Sleeve
The good news is, compared to the last step, this is a breeze!
To fit the long sleeve:
- Transfer your perfected short sleeve back on to the full sleeve pattern.
- Make a muslin of the longer sleeve (attached to a bodice using the perfected armscye).
- If your pattern has an elbow dart, ensure that it is sitting at the point of the elbow when it is bent.
- Check that the sleeve is long enough. To do this, bend your arm and check that the sleeve ends below your wrist. You may be surprised how much longer you need the sleeve to be than you think. It is better to have a bit of bunching on your lower arm than to have the sleeve pull any time you have to use your arms.
- If your pattern has a cuff, check the cuff placement and 'look'.
Step Five: Check Movement
The final step is the make one final muslin of your perfected sleeve and check you have full freedom of movement.
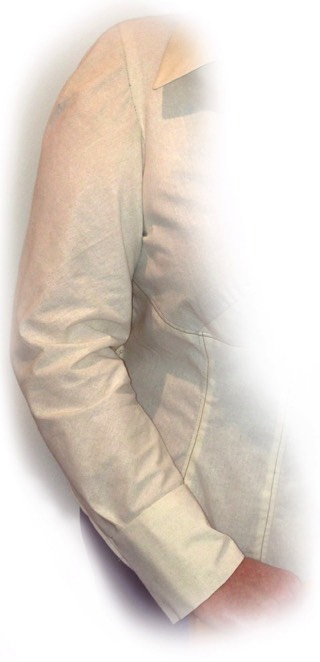
A 'sorted sleeve' takes most of the strain when you move so it does not pull across the back.
With all of the hard work that you have put in to get to this point this should just be a final check. However, in the unlikely event that there is still some pulling, experiment with unpicking the seams where the strain is occurring and consider adding more fabric at that point. You may also like to check your sleeve width. It may be that you need a little more ease at the widest point.